


Modern development with .NET Aspire and AWS
20 Nov 2024Introduction
Modern distributed applications rely on a complex ecosystem of services to function effectively. From Redis for caching to OpenTelemetry for monitoring, and database options like PostgreSQL or MongoDB, managing these components presents significant challenges, especially when deploying to cloud platforms like AWS or Azure. To face This article explores how .NET Aspire empowers developers to build and deploy cloud-native applications within the AWS ecosystem. We’ll demonstrate implementation using Visual Studio Code, though the principles apply equally to other development environments like Visual Studio or JetBrains.
What is .NET Aspire
.NET Aspire is not a new framework or a technology, it is a set of pillars that enable cloud-ready application development. It is delivered through a collection of NuGet packages that make it easier to develop, integrate, and orchestrate distributed applications comprising many small, interconnected services.
Aspire is based on the following three main pillars:
- Orchestration: Tools for running and linking multiple projects and their dependencies, make it easy to manage complex applications.
- Integrations: NuGet packages for popular services such as Redis and Postgres, with standardised interfaces for consistent and seamless connectivity.
- Tooling: Project templates and tools for Visual Studio and the .NET CLI, making it easy to create and interact with .NET Aspire projects.
These three pillars of Aspire provide a simplified and enhanced productivity environment for building, orchestrating and managing complex distributed applications.
If you’re interested in learning more about .NET Aspire check this overview https://learn.microsoft.com/en-us/dotnet/aspire/get-started/aspire-overview.
Set up your environment
To be able to work with .NET Aspire and AWS, and follow all the info described in this article, you need to have:
- .NET 8.0 or .NET 9.0
- An OCI-compliant container runtime, such as Docker Desktop or Podman
- Visual Studio Code with C# Dev Kit: Extension
- AWS .NET SDK
Build your .NET Aspire project
First of all, we’ll proceed by creating a .NET Aspire project. Before that, we should make sure that we have the latest versions of .NET workloads. To do that, we can open the terminal and write:
dotnet workload update
Then we can install, or update, the latest Aspire project templates:
dotnet new install Aspire.ProjectTemplates
Now, we can go to our project folder and write the following command to create our first Aspire solution:
dotnet new Aspire
The above command will create a .NET solution with basically two projects:
- a .NET AppHost project: this .NET project serves as the blueprint, defining all the individual parts of your distributed application and their interconnections.
- a .NET service defaults project: acts as a central hub for defining default settings
A .NET Aspire project’s core component is the AppHost project. In this project, we are going to define all the components that will run in our application environment. For example, if we need a Redis cache, as mentioned before, we will write the following code into the Program.cs file:
var builder = DistributedApplication.CreateBuilder(args);
builder.AddRedis("cache");
builder.Build().Run();
This is the center of our application. We can instruct how the application network should work and the connection between every service inside the AppHost project, following the basis of IaC (Infrastructure as Code) principle. Now, we can proceed by adding the services that we want to run. For example, if we need to add a WebAPI, we should first create a project, and then add to the AppHost solution. Let’s see how we can do it by using dotnet CLI:
dotnet new webapi -o AspireOnAWS.ApiService -n AspireOnAWS.MyApiService
dotnet sln add AspireOnAWS.ApiService/AspireOnAWS.ApiService.csproj
Nothing new? That’s right. But, if we want to use the newly created project directly into the AppHost, we should add it as Project Reference:
dotnet add AspireOnAWS.AppHost/AspireOnAWS.AppHost.csproj reference AspireOnAWS.ApiService/AspireOnAWS.ApiService.csproj
Now we can use the project in the Program.cs. Let’s see the updated code:
var builder = DistributedApplication.CreateBuilder(args);

var cache = builder.AddRedis("cache");

builder.AddProject<Projects.AspireOnAWS_ApiService>("api")
    .WithExternalHttpEndpoints()
    .WithReference(cache)
    .WaitFor(cache);

builder.Build().Run();
The above code adds two projects to the AppHost: the Redis cache, as showed before, and the ApiService. Since the ApiService project requires the Redis cache to run properly, we need to declare a reference by using the WithReference method, and a run dependency by using WaitFor. The latter means that we need to wait that the Redis cache service is ready before start the ApiService.
Run your .NET Aspire project
By simply executing dotnet run, we can now see the results:
What happens in the middle? .NET Aspire requests execution of a container based on Redis image. If this is not available locally, it tries to download from the registry (!). When the image is available, a container instance is built and run. Easy.
Ready for AWS
We had just seen how to create a .NET Aspire solution and connect it with a pre-built service. Now, we are ready to see how we can interact and use AWS to run our solution.
Following the IaC rule, with .NET 9, AWS introduces the possibility of using the AWS Cloud Development Kit (CDK) in a .NET Aspire project. A big improvement that allows building applications by defining your AWS resources directly in code. CDK is a coding abstraction built on top of CloudFormation. You can define your infrastructure using your preferred language, and CDK will automatically generate a CloudFormation template.
First of all, we should add the Aspire.Hosting.AWS package to our AppHost project:
dotnet add package Aspire.Hosting.AWS
Now we can start using AWS CDK to configure the services that we would like to use. For example, if we want to use a S3 Bucket, we can add it in our AppHost by using the following code:
var builder = DistributedApplication.CreateBuilder(args);

var cache = builder.AddRedis("cache");

var stack = builder.AddAWSCDKStack("MyAWSStack");
var bucket = stack.AddS3Bucket("MyAspireBucket");

builder.AddProject<Projects.AspireOnAWS_ApiService>("api")
    .WithExternalHttpEndpoints()
    .WithReference(cache)
    .WaitFor(cache)
    .WithReference(bucket)
    .WaitFor(bucket);

builder.Build().Run();
As seen before, also in this case by using WithReference we are declaring that the ApiService project should be able to see and use the S3 bucket. Futhermore, the WaitFor indicates that ApiService can be executed only when the S3 bucket service will be ready.
Resources created with these methods can be directly referenced by project resources and common properties like resource names, ARNs or URLs will be made available as configuration environment variables. The default config section will be AWS:Resources, this means that we can access to our bucket by using configuration["AWS:Resources:MyAspireBucket:BucketName"]. For example, in our ApiService, we can write the following code to retrieve the bucket name and comunicate with S3:
app.MapGet("/weatherforecast", async ([FromServices] IAmazonS3 s3client, IConfiguration configuration) =>
{
    // code omitted ...
    PutObjectRequest request = new PutObjectRequest
    {
        BucketName = configuration["AWS:Resources:MyAspireBucket:BucketName"],
        Key = "WhetherForecast.json",
        ContentType = "application/json",
        ContentBody = JsonConvert.SerializeObject(forecast)
    };

    await s3client.PutObjectAsync(request);

    // code omitted ...
})
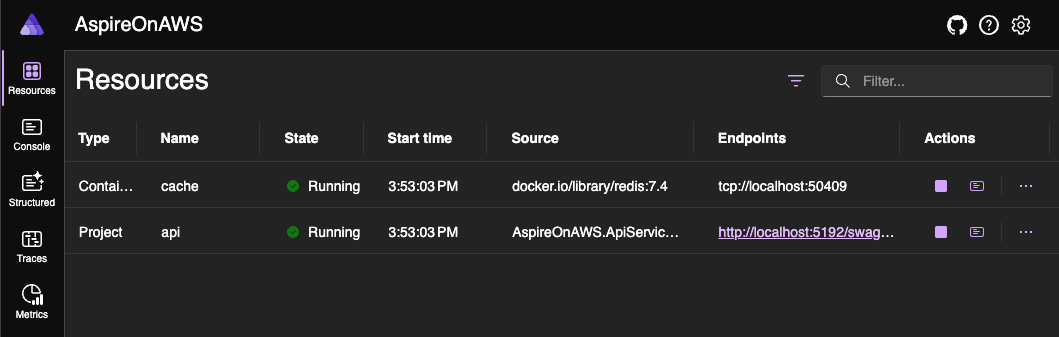
Executing that code will show the following dashboard:

Test your code
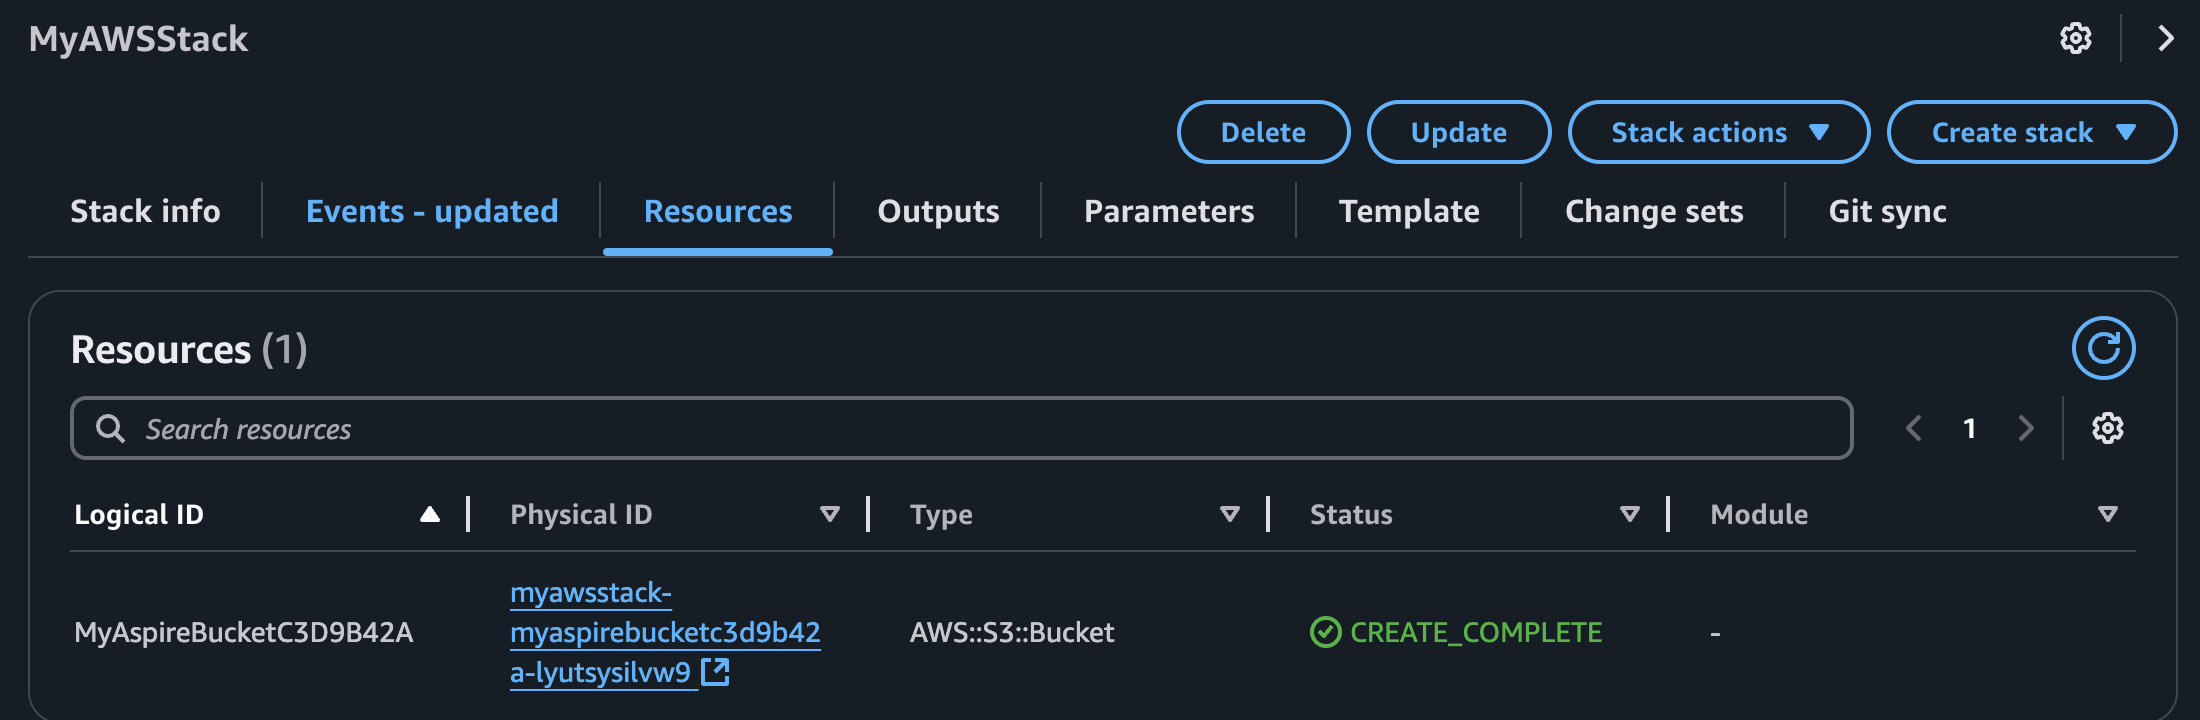
We can now execute the Swagger UI and test the service by executing the GET /weatherservice. As we can see after execution, now the result of the API will be written in a S3 Bucket. If we open the AWS console, in Cloud Formation section we can now see the related, and just created, AWS CloudFormation Stack:

By selecting the MyAWSStack and navigating into the Resources, we can see the MyAspireBucket resource:
How is this possible? Well, the Aspire.Hosting.AWS also includes and runs the CDK code under the hood. So when you run your application, even locally, the package will create the required AWS infrastructure for you. And that’s a great thing!
Conclusion
In this first post we have seen what .NET Aspire is and how we can use it in combination with AWS resources by using the AWS CDK. In the next few posts, we will look at additional ways to use the AWS .NET Aspire integration in our solutions.
Enjoy!